Free DIY Trash Can Enclosure Plans (2-Bin)
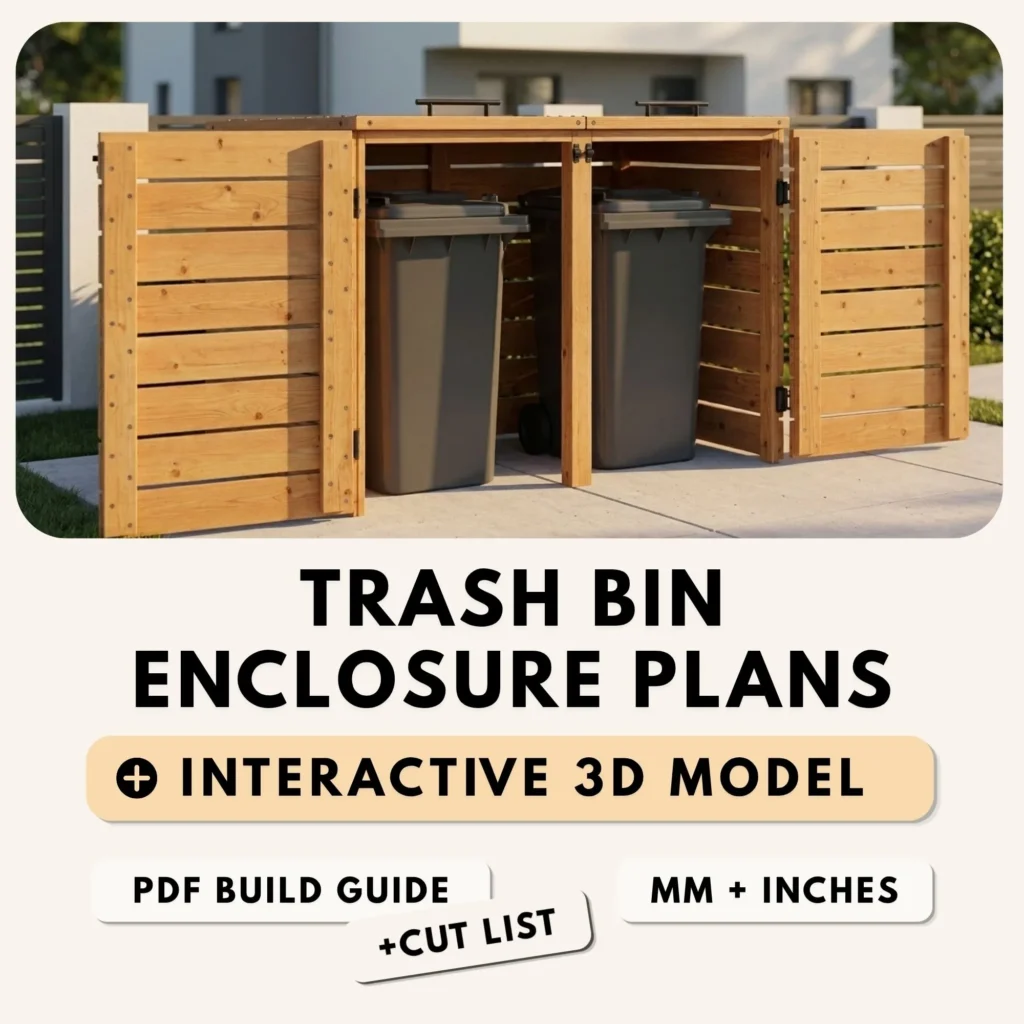
These free trash can enclosure plans show you how to build a clean wooden enclosure for two bins, with double front doors and separate hinged lids for easy everyday access. It is a practical way to hide outdoor trash cans beside a yard, patio, or driveway.
The complete trash can enclosure plans are available directly on this page. You will find the full cut list, fastener quantities, metric and imperial dimensions, construction drawings, and step-by-step assembly instructions below. You can also open the free interactive 3D model to inspect the structure from any angle before cutting your lumber.
The enclosure uses straightforward framing, commonly available lumber sizes, and basic woodworking tools. It is suitable for a confident beginner or an intermediate DIY builder.
Important: Trash can sizes vary. Measure both bins – including the wheels, handles, and fully opened lids – before buying or cutting materials. Adjust the enclosure dimensions where necessary.
Project Overview
| Project detail | Information |
|---|---|
| Project type | Free trash can enclosure plans for two bins |
| Capacity | Two outdoor trash cans |
| Finished footprint | Approximately 1525 × 945 mm (5′-0″ × 3′-1 1/2″) |
| Estimated build time | 6-10 hours |
| Skill level | Beginner to Intermediate |
| Units | Millimeters and inches |
| Main features | Double front doors, two hinged lids, ventilated timber cladding |
| 3D model | Free, works in mobile and desktop browsers |
What These Trash Can Enclosure Plans Include
- A complete lumber cut list with part references
- A complete hardware and fastener list
- Main frame assembly dimensions
- Side and back wall cladding layout
- Double door construction and installation
- Two hinged lid assemblies
- Final dimensions and assembly checks
- A free interactive 3D build model
Before You Start Building
Read through the complete guide once before cutting any material. The build is easiest when all parts are organized by reference mark and length, but avoid cutting every piece at once. Assemble the main structure in stages and confirm critical dimensions directly from the built frame before preparing the doors, lids, and finishing pieces.
Prepare a flat, stable working area with enough room to turn and assemble the full frame. The final installation base should be level within approximately 5 mm (3/16″) across the footprint. A level base helps the doors and lids remain aligned and prevents the enclosure from twisting.
Keep the following tolerances in mind:
- Keep frames square. The difference between diagonal measurements should not exceed 5 mm (3/16″).
- Keep vertical frame members plumb within approximately 3 mm per 1 m (1/8″ per 3 ft).
- Use a cutting tolerance of approximately ±2 mm (±1/16″).
- Maintain consistent cladding gaps for ventilation and natural wood movement.
- Never force a part into place. Actual lumber dimensions and moisture content can vary.
Tools You Will Need
Before using saws, drills, or other power tools, review the OSHA woodworking safety guidance and follow the safety instructions provided by each tool manufacturer.
Required tools
- Tape measure
- Pencil or marker
- Circular saw or miter saw
- Drill/driver
- Spirit level
- Speed square or framing square
- Safety glasses
- Work gloves
- Hearing protection
Helpful but optional tools
- Impact driver
- Countersink bit
- Clamps
- Rubber mallet
- Orbital sander
- Workbench or sawhorses
Materials and Hardware
Use straight, exterior-rated lumber suitable for outdoor construction. Nominal sizes such as 1×6, 1×2, 2×2, and 2×4 may have different actual dimensions depending on your country and supplier, so check the timber before cutting.
For longer service life, use exterior-rated or corrosion-resistant fasteners and finish all timber with exterior wood oil, stain, paint, or another suitable preservative. Applying end-grain sealer to freshly cut surfaces is also recommended.
Trash Can Enclosure Plans: Complete Cut List
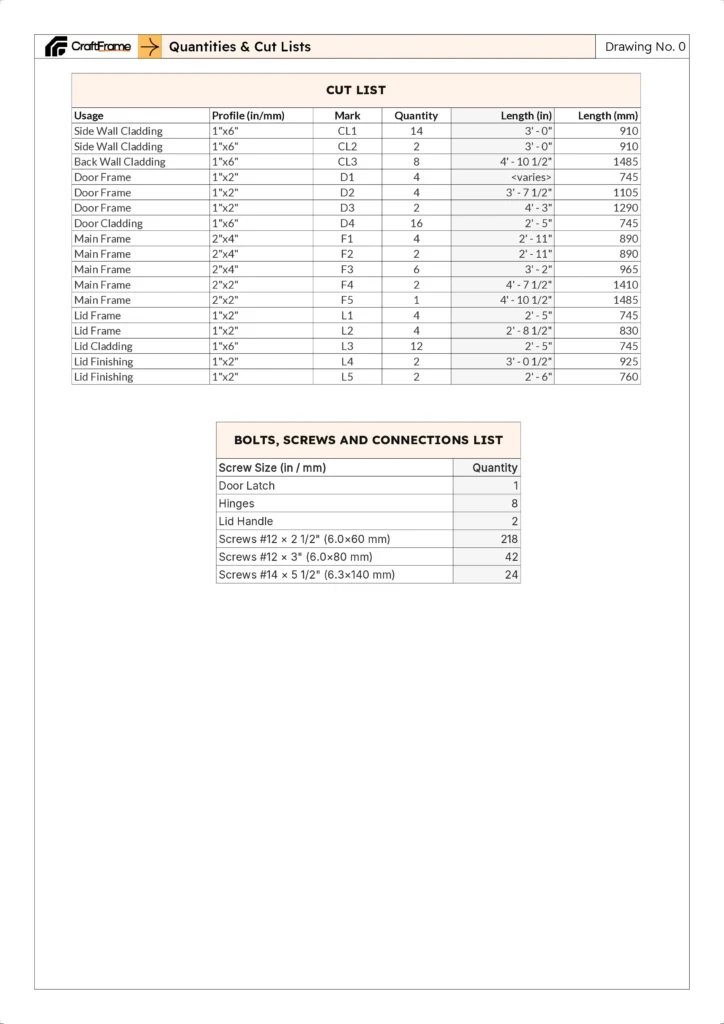
The part marks in this table match the marks used in every drawing below. Metric and imperial values are both included so you can work in your preferred system.
| Use | Profile | Mark | Qty. | Length (inches) | Length (mm) |
| Side wall cladding | 1×6 | CL1 | 14 | 3′-0″ | 910 |
| Side wall cladding | 1×6 | CL2 | 2 | 3′-0″ | 910 |
| Back wall cladding | 1×6 | CL3 | 8 | 4′-10 1/2″ | 1485 |
| Door frame | 1×2 | D1 | 4 | 2′-5 1/2″ | 745 |
| Door frame | 1×2 | D2 | 4 | 3′-7 1/2″ | 1105 |
| Door diagonal brace | 1×2 | D3 | 2 | 4′-3″ | 1290 |
| Door cladding | 1×6 | D4 | 16 | 2′-5″ | 745 |
| Main frame | 2×4 | F1 | 4 | 2′-11″ | 890 |
| Main frame | 2×4 | F2 | 2 | 2′-11″ | 890 |
| Main frame | 2×4 | F3 | 6 | 3′-2″ | 965 |
| Main frame connector | 2×2 | F4 | 2 | 4′-7 1/2″ | 1410 |
| Main frame connector | 2×2 | F5 | 1 | 4′-10 1/2″ | 1485 |
| Lid frame | 1×2 | L1 | 4 | 2′-5″ | 745 |
| Lid frame | 1×2 | L2 | 4 | 2′-9″ | 830 |
| Lid cladding | 1×6 | L3 | 12 | 2′-5″ | 745 |
| Lid edge finishing | 1×2 | L4 | 2 | 3′-0 1/2″ | 925 |
| Lid edge finishing | 1×2 | L5 | 2 | 2′-6″ | 760 |
Hardware and fastener list
| Item | Quantity |
| Door latch | 1 |
| Hinges | 8 |
| Lid handles | 2 |
| #12 × 2 1/2″ exterior screws (6.0 × 60 mm) | 218 |
| #12 × 3″ exterior screws (6.0 × 80 mm) | 42 |
| #14 × 5 1/2″ exterior screws (6.3 × 140 mm) | 24 |
Hardware styles can be selected to suit the appearance you want. Use outdoor-rated hinges, handles, and a latch that are compatible with the chosen timber thickness.
Step 1: Build the Main Frame
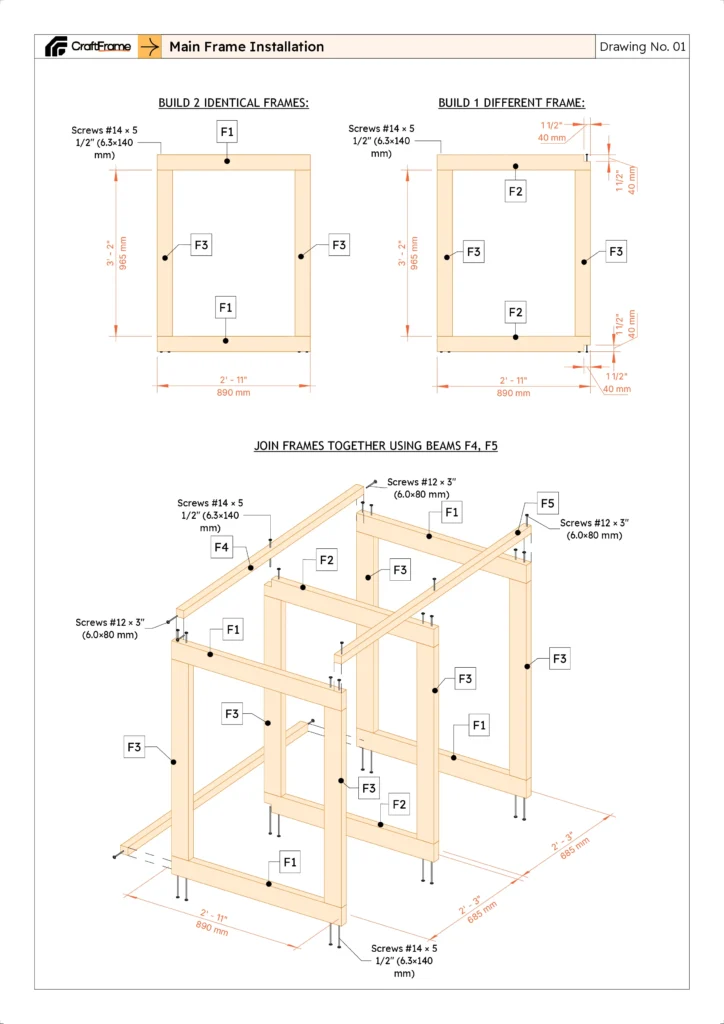
The main frame establishes the size, alignment, and strength of the entire build. These trash can enclosure plans use two identical side frames and one center frame. Take time to build them square, because errors at this stage will affect the wall cladding, doors, and lids.
Prepare parts F1, F2, F3, F4, and F5.
Build two identical side frames
- Lay two F1 pieces and two F3 pieces on a flat surface as shown in Drawing No. 01.
- Assemble a rectangular frame using two exterior-rated screws at each structural connection.
- Measure both diagonals and adjust the frame until it is square.
- Build a second identical frame.
Build the center frame
- Assemble the third frame using two F2 pieces and two F3 pieces.
- Follow Drawing No. 01 carefully because this frame has a different internal layout from the two side frames.
- Use two screws at every connection.
- Check the diagonals before fully tightening the screws.
Join the three frames
- Stand the three frames in their final positions on a flat base.
- Connect them with one F4 member at the bottom, one F4 member at the top, and one F5 member at the top, in the positions shown in the drawing.
- Secure every connection with the specified exterior-rated screws.
- Recheck the overall width, depth, squareness, and plumb before installing any cladding.
Step 2: Install the Side and Back Wall Cladding
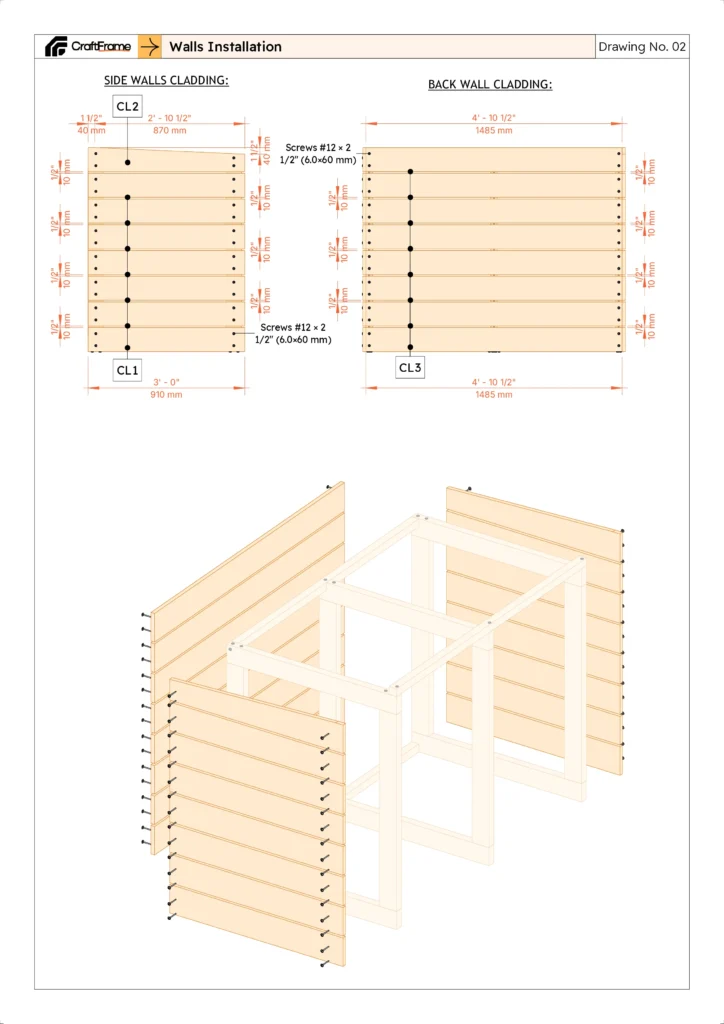
The horizontal cladding hides the bins while leaving gaps for airflow, moisture control, and natural timber movement. Use a temporary spacer block to keep the gaps consistent.
Prepare parts CL1, CL2, and CL3.
Side walls
- Start with one side wall and position the first CL1 board according to Drawing No. 02.
- Fix the board to the frame using exterior-rated 6.0 × 60 mm (#12 × 2 1/2″) screws.
- Continue upward with the remaining CL1 boards, maintaining approximately 10-15 mm (about 1/2″) between boards.
- Measure the remaining space at the top and trim CL2 if required for an accurate fit.
- Repeat the same process on the second side wall.
Back wall
- Position the first CL3 board across the back frame.
- Check that it is level before fastening it.
- Install the remaining CL3 boards with the same 10-15 mm gaps used on the side walls.
- Check the ends of all boards for consistent alignment before fully tightening the screws.
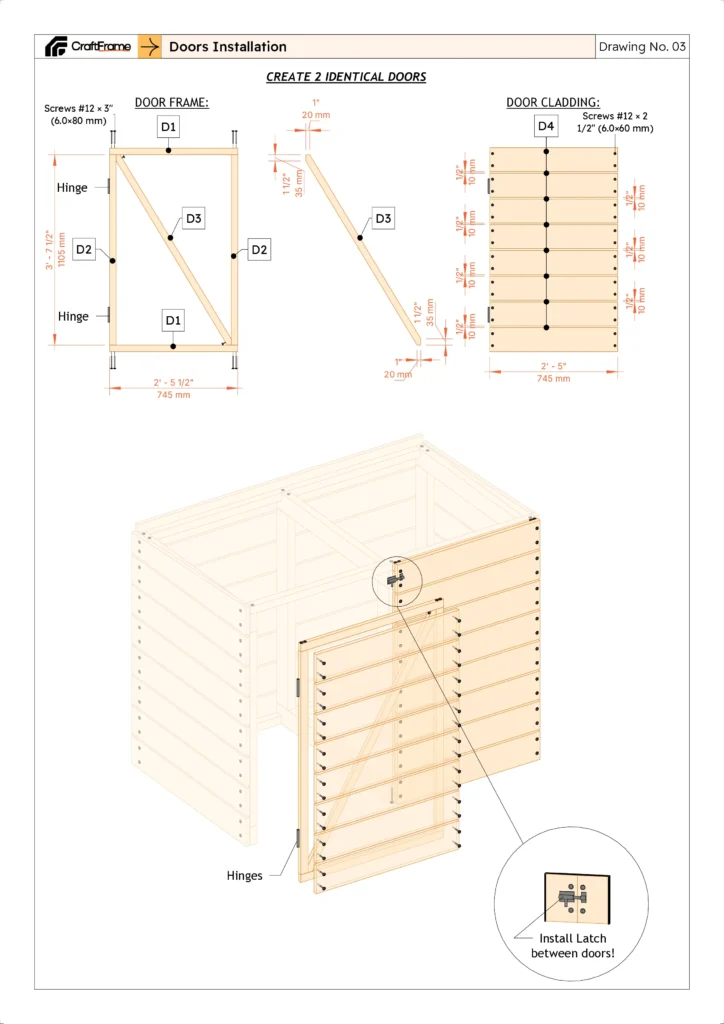
Step 3: Build and Install the Double Doors
Build two identical doors. Assemble and test the bare frames first, then install the horizontal cladding after confirming that both doors fit the opening correctly.
Prepare parts D1, D2, D3, and D4.
Assemble each door frame
- Arrange two D1 pieces and two D2 pieces into a rectangular frame as shown in Drawing No. 03.
- Check that the frame is square and secure the corners with 6.0 × 80 mm (#12 × 3″) exterior screws.
- Position D3 diagonally across the frame.
- Mark and cut both ends of D3 so the brace fits flush against the frame.
- Fasten the diagonal brace securely.
- Repeat the process to create a second identical door.
Install the hinges and test the doors
- Attach two hinges to each door frame in the positions shown in the drawing.
- Mount both door frames to the main enclosure.
- Adjust the hinge positions until the doors are level, evenly spaced, and able to open without binding.
- Confirm the fit before adding the cladding.
Add the door cladding
- Install D4 boards horizontally across each door.
- Maintain approximately 10-15 mm (about 1/2″) between boards, matching the wall cladding.
- Fasten every board with two 6.0 × 60 mm (#12 × 2 1/2″) screws at each end.
- Check that both doors still open freely after the cladding is installed.
- Install one outdoor-rated latch between the two doors.
Step 4: Build and Install the Hinged Lids
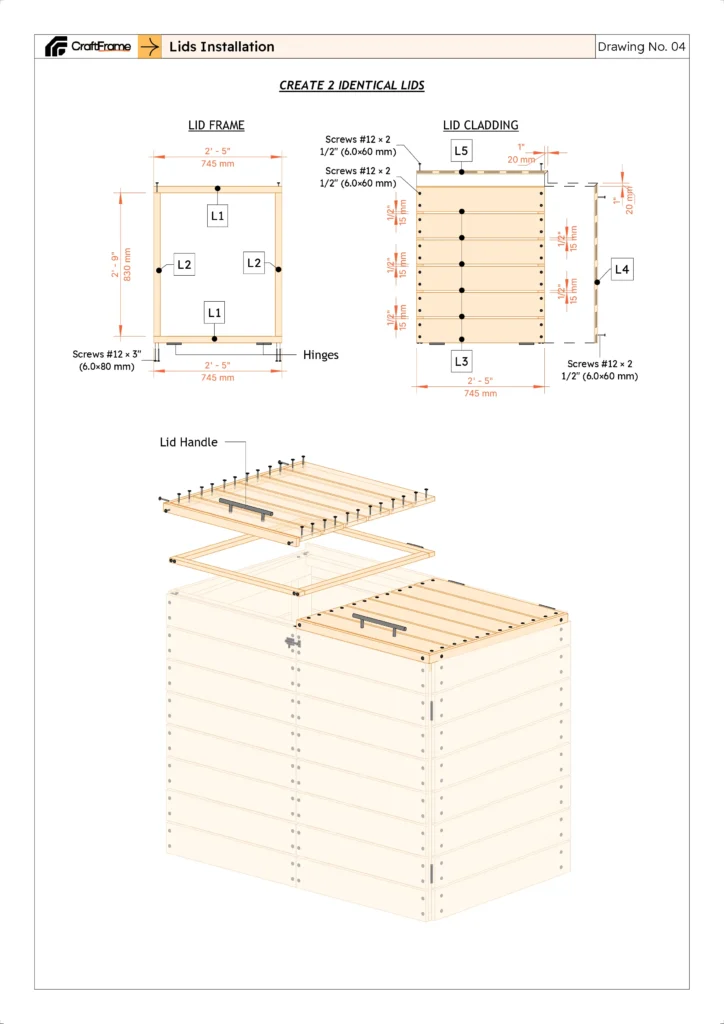
The enclosure uses two separate lids so each trash can can be accessed independently. Build two identical assemblies.
Prepare parts L1, L2, L3, L4, and L5.
Assemble each lid frame
- Arrange two L1 pieces and two L2 pieces into a rectangular frame according to Drawing No. 04.
- Use two 6.0 × 80 mm (#12 × 3″) exterior screws at each frame connection.
- Check the frame for square before fully tightening the screws.
- Attach two hinges to the rear edge of the lid frame.
Install the lid cladding
- Position the L3 boards on top of the frame.
- Maintain consistent gaps of approximately 15 mm (about 1/2″) between boards.
- Secure the boards using exterior-rated 6.0 × 60 mm (#12 × 2 1/2″) screws.
Finish the lid edges
- Cut and fit L4 and L5 around the lid edges as shown in Drawing No. 04.
- Confirm the finished lid dimensions against the actual enclosure before final fastening.
- Secure the edge boards with exterior-rated screws.
- Install one handle in a comfortable lifting position.
- Repeat the complete process for the second lid.
Mount the lids
- Position both finished lids on the enclosure.
- Attach the hinges to the rear top frame.
- Maintain an even gap between the lids and check that neither lid rubs against the frame or the other lid.
- Open and close each lid several times before fully tightening the hinge screws.
Step 5: Final Assembly and Outdoor Finish
Before applying the final finish, inspect the complete enclosure and test every moving part.
- Confirm that both front doors open and close smoothly.
- Check that the latch aligns and locks without forcing the doors.
- Open and close both lids and adjust the hinges if necessary.
- Tighten all structural fasteners, but do not over-tighten screws in the cladding.
- Pre-drill any new holes close to board ends or edges to reduce the risk of splitting.
- Sand sharp edges and any rough cut surfaces.
- Apply an exterior-rated preservative, oil, stain, or paint according to the product manufacturer’s instructions.
- Treat exposed end grain carefully because it absorbs moisture faster than the face of the board.
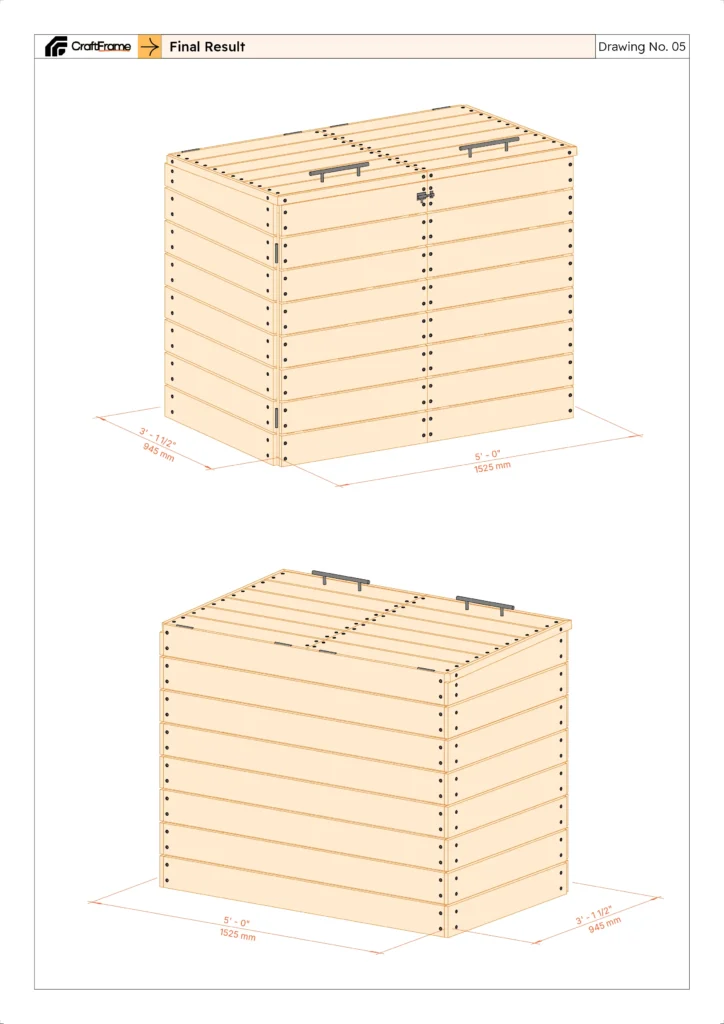
The finished footprint is approximately 1525 × 945 mm (5′-0″ × 3′-1 1/2″). Compare the completed enclosure with Drawing No. 05 and make any final alignment adjustments before placing the bins inside.
How to Adjust These Trash Can Enclosure Plans for Different Bin Sizes
Do not rely only on the advertised capacity of a trash can. Two bins with the same volume can have different wheel, handle, and lid dimensions.
Before modifying the design:
- Place both bins side by side on a level surface.
- Measure their combined width at the widest points.
- Measure the maximum depth, including wheels and handles.
- Open the bin lids fully and measure the height and clearance they require.
- Add practical clearance so the bins can be rolled in and out without scraping the frame.
If you change the overall enclosure width, adjust the horizontal frame connectors, back wall cladding, doors, and lids together. If you change the depth, adjust the side frames, side cladding, and lids. Keep the ventilation gaps consistent and always confirm door and lid dimensions from the assembled frame before cutting finishing pieces.
Use the Free Interactive 3D Model
The interactive model lets you rotate the enclosure, measure parts in millimeters or inches, and use section views to understand how the frame, cladding, doors, and lids connect. It works directly in a mobile or desktop browser and does not require an app.
Use it as a visual reference alongside the written instructions, drawings, and trash can enclosure plans on this page.
Frequently Asked Questions
What size trash cans will fit inside this enclosure?
These trash can enclosure plans are designed for two outdoor bins, but bin dimensions vary by brand and region. Compare your bins with the dimensions in the drawings and allow extra clearance for wheels, handles, and lid movement before cutting any material.
Can I make the enclosure wider or deeper?
Yes. The framing logic can be adapted, but connected components must be changed together. A width change affects the horizontal frame connectors, back cladding, doors, and lids. A depth change affects the side frames, side cladding, and lids.
What type of wood should I use?
Use straight, exterior-rated timber suitable for your climate. Pressure-treated lumber, cedar, larch, or another durable outdoor species can be used depending on local availability. Check actual board dimensions before cutting because nominal sizes vary.
Does the timber need a protective finish?
Yes. An exterior oil, stain, paint, or wood preservative will reduce moisture damage and extend the service life of the enclosure. Pay special attention to cut ends and other exposed end grain.
Why are there gaps between the cladding boards?
The gaps improve ventilation, help moisture escape, and allow the wood to expand and contract. Use a spacer block during installation to keep them consistent.
Can I build this with basic tools?
Yes. The main tools are a tape measure, saw, drill/driver, level, and square. The project does not require advanced joinery or specialist woodworking machinery.
More Free CraftFrame Tools
Planning another outdoor building project? Explore our complete collection of free CraftFrame construction tools. These practical calculators can help you choose a foundation, estimate concrete quantities, and plan post spacing and hole depth before construction begins.
- Shed Foundation Selector
- Pile Concrete Calculator
- Concrete Slab Calculator
- Pad Footing Calculator
- Fence Post Concrete Calculator
- Fence Post Spacing Calculator
- Post Hole Depth Calculator
Download the Free PDF Plans
Prefer to work from a printable guide? Download the complete trash can enclosure plans as a free PDF, including the cut list, metric and imperial dimensions, construction drawings, and step-by-step assembly instructions.
Disclaimer
These plans are provided for educational purposes only. Site conditions, material properties, local regulations, and individual skill levels vary. CraftFrame assumes no liability for injuries, damage, or construction errors. Follow tool and material manufacturer instructions, use appropriate personal protective equipment, and consult a qualified professional whenever you are unsure.